Work functions#
A work function is the simplest of the two types of workflows in AiiDA. It can call one or more calculations and return data that has been created by the calculation it has called. Moreover, work functions can also call other workflows, allowing you to write nested workflows.
In this section, you will learn to:
Understand how to add simple Python functions to the provenance.
Learn how to write and launch a simple workflow in AiiDA.
Requirements
For the following sections you will require to have a StructureData node in your database.
If you already went through the previous sections (in particular, the one about running processes), you should already have a Si structure for which we know the instructions work fine.
If you haven’t done these, you can get this structure by running:
$ wget https://aiida-tutorials.readthedocs.io/en/tutorial-2022-intro/_downloads/92e2828a59fc133b391bbf62f0fd1b59/Si.cif
And then import it into your database with the verdi CLI.
$ verdi data core.structure import ase Si.cif
  Successfully imported structure Si2 (PK = 1)
Note that the output of verdi data core.structure import will probably show a different value for the PK of the structure node you just created: make a note of this PK, as you will need to replace it in code snippets later in this tutorial.
You can also manually download the ![]()
Si.cif structure file and copy it in your work environment instead of using wget.
Calculation functions#
Calculation functions are a great way to keep track of steps that are part of your scientific workflow and written in Python to the provenance of AiiDA.
In order to do so, you have to add a calcfunction decorator to the Python function.
A simple example is the multiply calculation function from the AiiDA basics section:
from aiida.engine import calcfunction

@calcfunction
def multiply(x, y):
    return x * y
In a sense, this example is deceptively simple.
Let’s consider a slightly more complicated example: a rescale function that takes an ASE Atoms structure and rescales the unit cell with a certain scale factor:
def rescale(structure, scale):

    new_cell = structure.get_cell() * scale
    structure.set_cell(new_cell, scale_atoms=True)

    return structure
Open a verdi shell or Jupyter notebook (with the AiiDA magic: %aiida) and use the code snippet above to define the rescale function.
Next, load any StructureData, for example using the QueryBuilder:
In [2]: from aiida.orm import StructureData
   ...: structure = QueryBuilder().append(StructureData).first()[0]
In order to test the method, we need to convert the StructureData into an ASE Atoms instance.
This can be easily done using the get_ase() method:
In [3]: ase_structure = structure.get_ase()
Let’s have a look at what structure we found:
In [4]: ase_structure
Out[4]: Atoms(symbols='NaNbO3', pbc=True, cell=[3.9761497211, 3.9761497211, 3.9761497211], masses=...)
Next, use the rescale function to double the lattice vectors of the unit cell:
In [5]: rescale(ase_structure, 2)
Out[5]: Atoms(symbols='NaNbO3', pbc=True, cell=[7.9522994422, 7.9522994422, 7.9522994422], masses=...)
Great! That all seems to be working as expected. Now it’s time to convert our Python function into a calculation function.
Working with nodes#
Try to adapt the rescale function above into a calculation function by adding a calcfunction decorator:
from aiida.engine import calcfunction

@calcfunction
def rescale(structure, scale):

    new_cell = structure.get_cell() * scale
    structure.set_cell(new_cell, scale_atoms=True)

    return structure
Maybe you already see why just adding the calcfunction decorator is not sufficient.
Trying to run the method again with the ase_structure and 2 scaling factor will fail, since neither are a Data node:
In [7]: rescale(ase_structure, 2)
(...)
ValueError: Error occurred validating port 'inputs.structure': value 'structure' is not of the right type.
Got '<class 'ase.atoms.Atoms'>', expected '(<class 'aiida.orm.nodes.data.data.Data'>,)'
However, passing the originally imported StructureData stored in structure and Float(2) won’t work either:
In [8]: rescale(structure, Float(2))
(...)
AttributeError: 'StructureData' object has no attribute 'get_cell'
The reason for these failures is that we need to adjust the rescale function further, to make sure it can both accept AiiDA nodes as inputs, as well as returns an AiiDA node:
from aiida.engine import calcfunction


@calcfunction
def rescale(structure, scale):
    """Calculation function to rescale a structure

    :param structure: An AiiDA `StructureData` to rescale
    :param scale: The scale factor (for the lattice constant)
    :return: The rescaled structure
    """
    from aiida.orm import StructureData

    ase_structure = structure.get_ase()
    scale_value = scale.value

    new_cell = ase_structure.get_cell() * scale_value
    ase_structure.set_cell(new_cell, scale_atoms=True)

    return StructureData(ase=ase_structure)
Let’s explain the required changes in more detail:
from aiida.orm import StructureData
Here the StructureData class is imported, since we need it later to convert the ASE Atoms structure into a StructureData node so we can output it.
    ase_structure = structure.get_ase()
    scale_value = scale.value
These two lines simply convert the inputs, which have to be AiiDA nodes, into the corresponding ASE Atoms structure and the Python float base type that we need to scale the unit cell.
return StructureData(ase=ase_structure)
After the ase_structure has been rescaled, we need to convert it back into a StructureData node that is then returned by the rescale function as an output.
So, in reality we have to do two things in order to adapt a regular Python function into a calculation function that can be tracked in the provenance:
Exercises#
(1) Run the calculation function version of rescale with AiiDA nodes as inputs.
Convert the output StructureData node back into an ASE Atoms structure.
Is the result what you expected?
Solution
After redefining the rescale method with the code snippet above, running the calculation function with our originally imported StructureData node and a Float node works without a hitch:
In [10]: new_structure = rescale(structure, Float(2))
Converting this into an ASE Atoms object using the get_ase() method:
In [11]: new_structure.get_ase()
Out[11]: Atoms(symbols='NaNbO3', pbc=True, cell=[7.9522994422, 7.9522994422, 7.9522994422], masses=...)
we can see that the lattice cell vectors are twice as large as initially, which is the desired result.
(2) Why was the multiply function so deceptively simple?
That is, why was conversion to/from AiiDA nodes not an issue there?
Solution
In the case of the multiply function, the x and y inputs are simply multiplied using *.
Since x and y are AiiDA Int nodes and the multiplication operator has already been overloaded to handle them, this automatically results in a new Int node whose value is the product of the two nodes:
In [12]: Int(2) * Int(3)
Out[12]: <Int: uuid: cfff6b68-69a2-47e2-8feb-cbd039bb0588 (unstored) value: 6>
You can see that the result of multiplying two Int nodes is simply another Int node.
This can then be directly returned in the multiply method, avoiding the conversion issues we encountered for the rescale example.
(3) Since calculation functions are tracked in the provenance, you should be able to find those you have just run using the verdi process list command.
If you’ve tried the incorrect rescale calculation function above, this list will contain one Excepted result.
Use what you’ve learned in the Troubleshooting module to figure out what went wrong here.
Solution
Looking at all processes that have completed in the last day:
$ verdi process list -a -p 1
  PK  Created    Process label    Process State    Process status
----  ---------  ---------------  ---------------  ----------------
(...)
2732  7m ago     rescale          ⨯ Excepted
2734  7m ago     rescale          ⏹ Finished [0]
Looking at the process report:
$ verdi process report <PK>
2021-07-06 23:20:04 [122]: [2732|rescale|on_except]: Traceback (most recent call last):
  File "/opt/conda/lib/python3.7/site-packages/plumpy/process_states.py", line 230, in execute
    result = self.run_fn(*self.args, **self.kwargs)
  File "/opt/conda/lib/python3.7/site-packages/aiida/engine/processes/functions.py", line 395, in run
    result = self._func(*args, **kwargs)
  File "/tmp/ipykernel_2974/3046260054.py", line 6, in rescale
    new_cell = structure.get_cell() * scale
AttributeError: 'StructureData' object has no attribute 'get_cell'
It’s clear that this corresponds to the case where we attempted to pass a StructureData, but the function failed since the get_cell() method is defined for the Atoms class, not the StructureData one.
Writing a work function#
Writing a work function whose provenance is automatically stored can be achieved by writing a Python function and decorating it with the workfunction() decorator:
"""Basic calcfunction-based workflows for demonstration purposes."""
from aiida.engine import calcfunction, workfunction


@calcfunction
def add(x, y):
    return x + y


@calcfunction
def multiply(x, y):
    return x * y


@workfunction
def add_multiply(x, y, z):
    """Add two numbers and multiply it with a third."""
    addition = add(x, y)
    product = multiply(addition, z)
    return product
It is important to reiterate here that the workfunction()-decorated add_multiply() function does not create any new data nodes.
The add() and multiply() calculation functions create the Int data nodes, all the work function does is return the results of the multiply() calculation function.
Moreover, both calculation and work functions can only accept and return data nodes, i.e. instances of classes that subclass the Data class.
Copy the code snippet above and put it into a Python file (e.g. add_multiply.py), or download it directly using the link next to it.
In the terminal, navigate to the folder where you stored the script.
Next, import the add_multiply work function in the verdi shell:
In [1]: from add_multiply import add_multiply
Important
If you’re running the verdi shell commands in a Jupyter notebook, you need to restart the notebook kernel before it will recognise any new Python modules, or changes in a Python module.
The notebook can be restarted with the circular arrow button at the top or by pressing zero 0 twice in quick succession.

Fig. 8 Restarting the Jupyter Notebook.#
Similar to a calculation function, running a work function is as simple as calling a typical Python function: simply call it with the required input arguments:
In [2]: result = add_multiply(Int(2), Int(3), Int(5))
Here, the add_multiply work function returns the output Int node and we assign it to the variable result.
Again, note that the input arguments of a work function must be an instance of a Data node, or any of its subclasses.
Just calling the add_multiply function with regular integers will result in a ValueError, as these cannot be stored in the provenance graph.
When we check the AiiDA list of all processes that have terminated in the past day:
$ verdi process list -a -p 1
  PK  Created    Process label    Process State    Process status
----  ---------  ---------------  ---------------  ----------------
...
1859  1m ago     add_multiply     ⏹ Finished [0]
1860  1m ago     add              ⏹ Finished [0]
1862  1m ago     multiply         ⏹ Finished [0]
Copy the PK of the add_multiply work function and check its status with verdi process status (in the above example, the PK is 1859):
$ verdi process status <PK>
add_multiply<1859> Finished [0]
    ├── add<1860> Finished [0]
    └── multiply<1862> Finished [0]
Finally, you can also check the details of the inputs and outputs of the work function:
$ verdi process show <PK>
Notice that each input and output to the work function add_multiply is stored as a node, and that the work chain has CALLED both the add and multiply calculation functions:
Property     Value
-----------  ------------------------------------
type         add_multiply
state        Finished [0]
pk           1859
uuid         c65df725-6065-40ec-8343-6ee9ef68ca9a
label        add_multiply
description
ctime        2021-06-07 14:48:06.342948+00:00
mtime        2021-06-07 14:48:06.835870+00:00

Inputs      PK  Type
--------  ----  ------
x         1856  Int
y         1857  Int
z         1858  Int

Outputs      PK  Type
---------  ----  ------
result     1863  Int

Called      PK  Type
--------  ----  --------
CALL      1860  add
CALL      1862  multiply
Exercise#
Let’s look at multiple ways to generate the provenance graph and what this can teach us.
(1) Generate the provenance graph of the add_multiply work function without any additional options.
Does anything seem missing here?
Solution
You should know the correct command by now:
$ verdi node graph generate <PK>
You might notice here that there are no links between the Int nodes and the calculation functions called by the work function.
These are not shown by default, but in the next exercise you’ll use an option to do so.
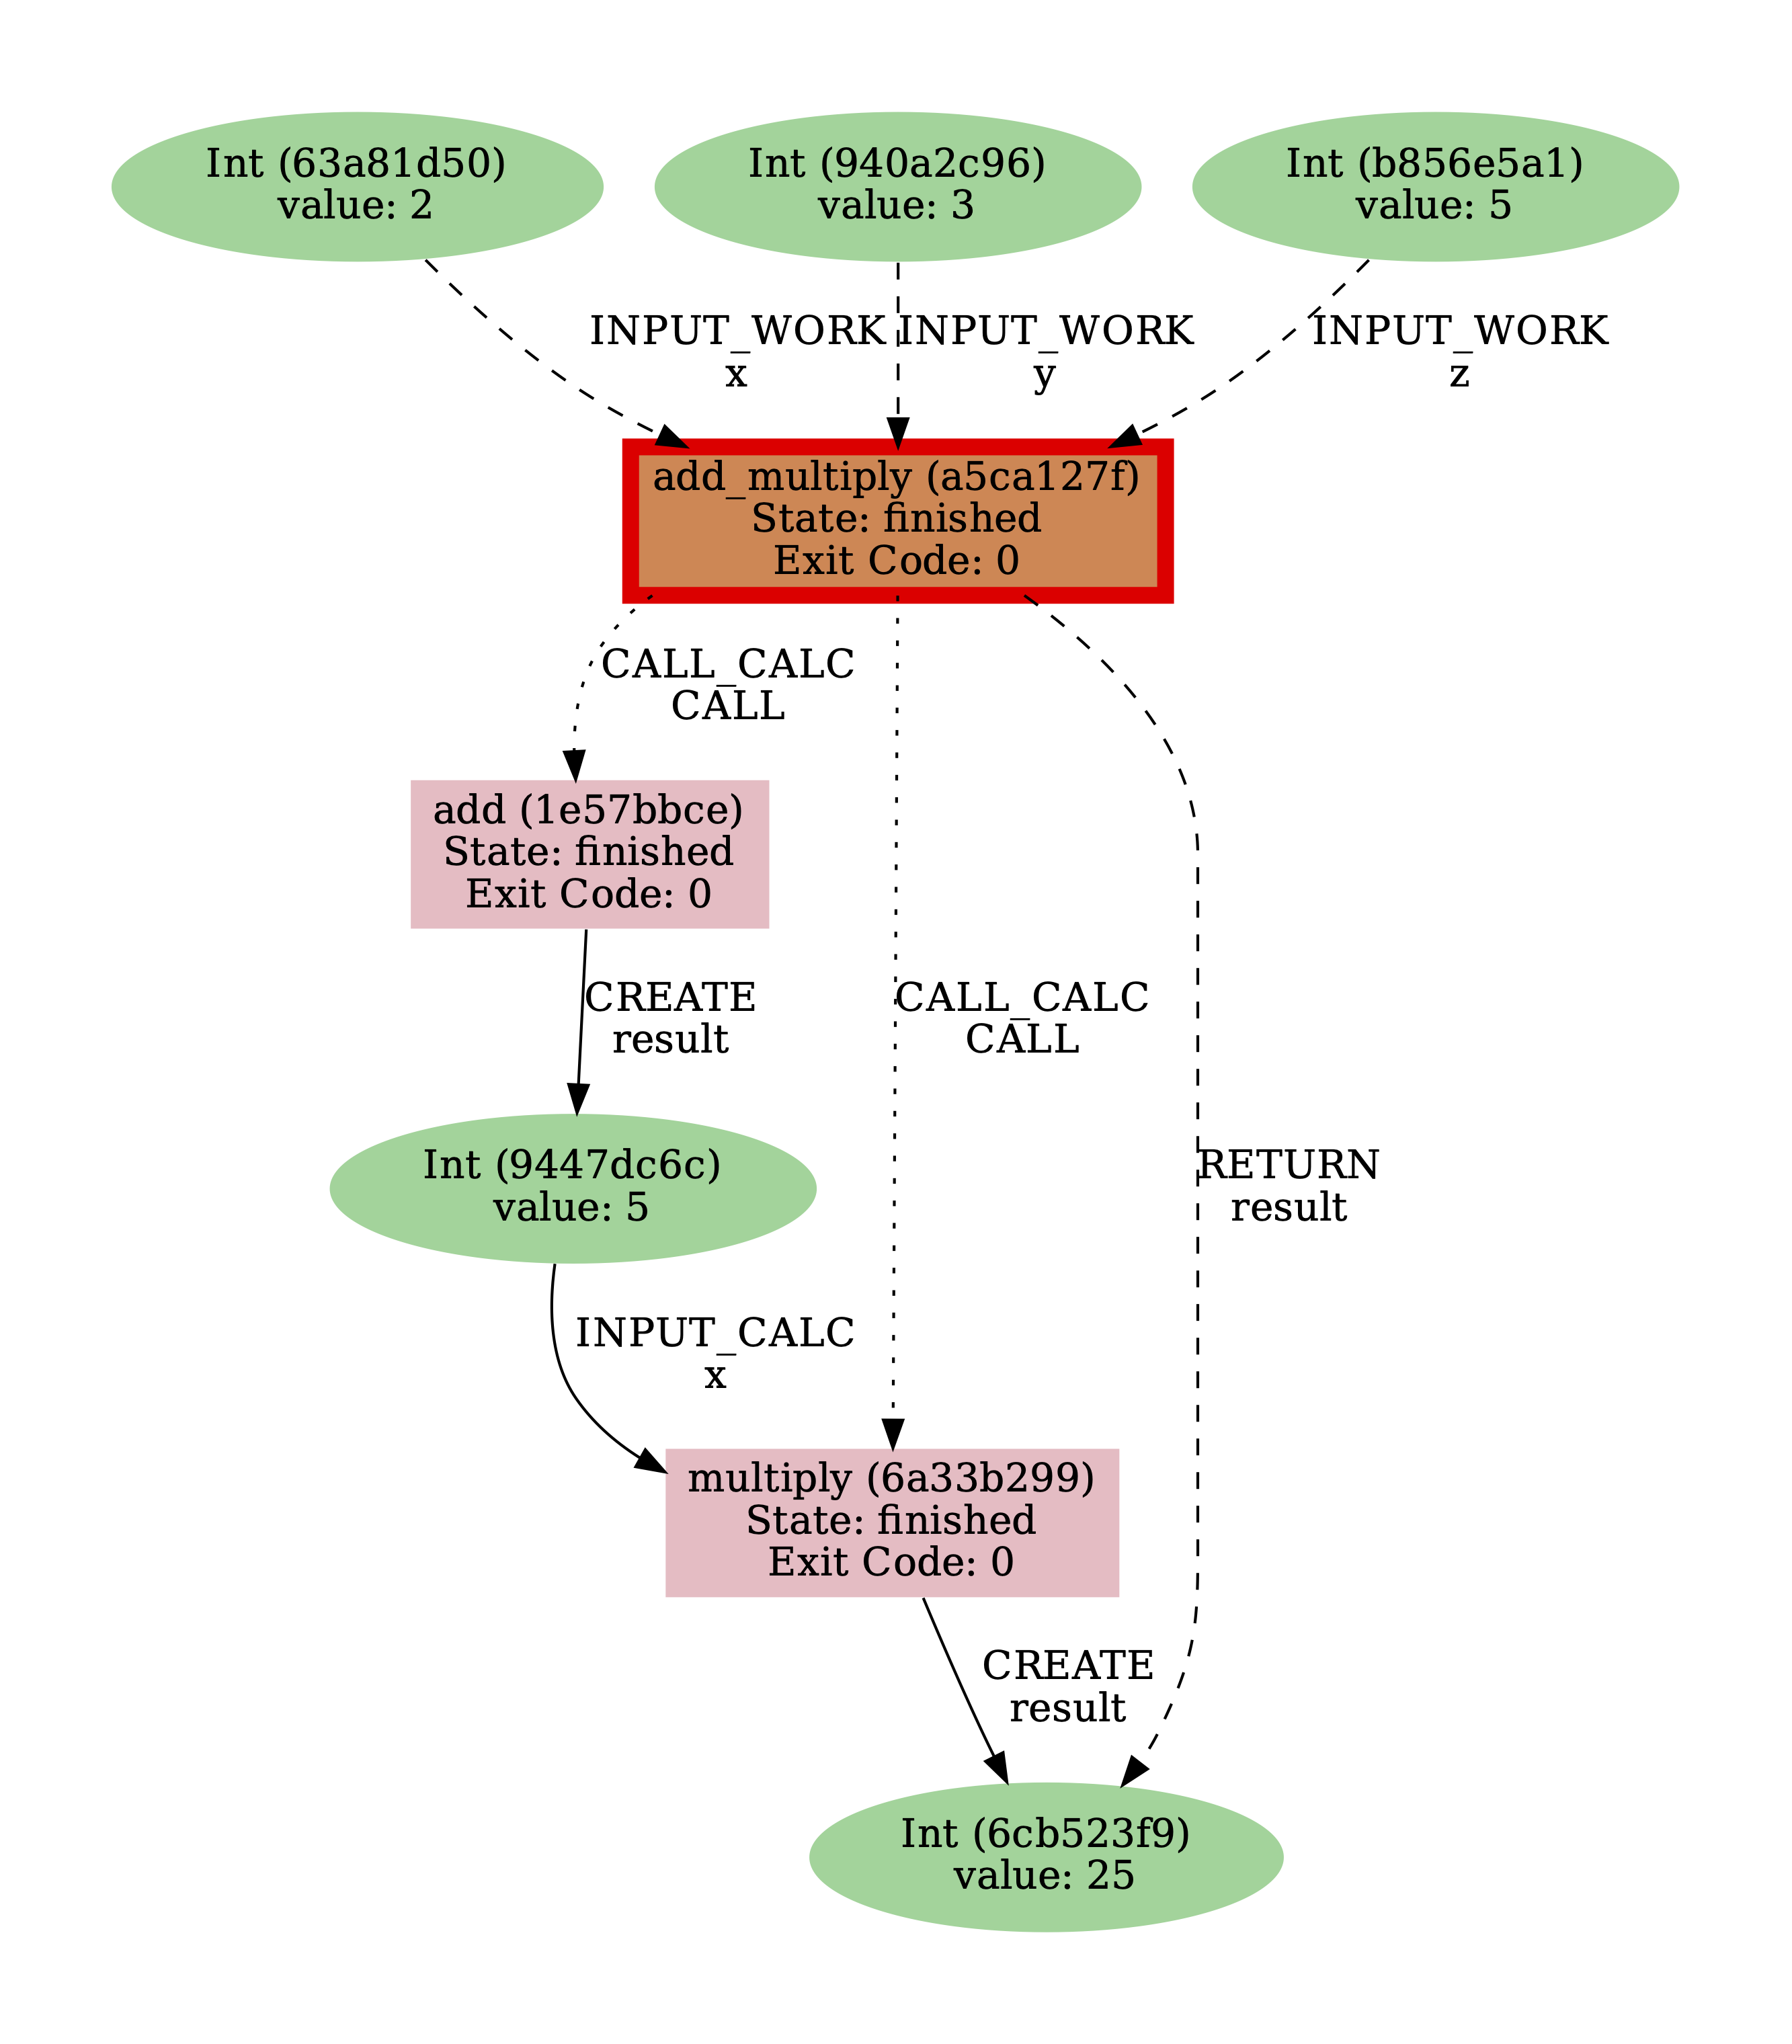
Fig. 9 Default provenance graph for the add_multiply work function.#
(2) Try to generate the provenance graph again, but this time with the -i, --process-in option.
You can use verdi node graph generate --help for more information about the various options of this command.
Solution
By using the -i, --process-in option, you can see that the INPUT_CALC links missing from the previous provenance graph are now included:
$ verdi node graph generate -i <PK>
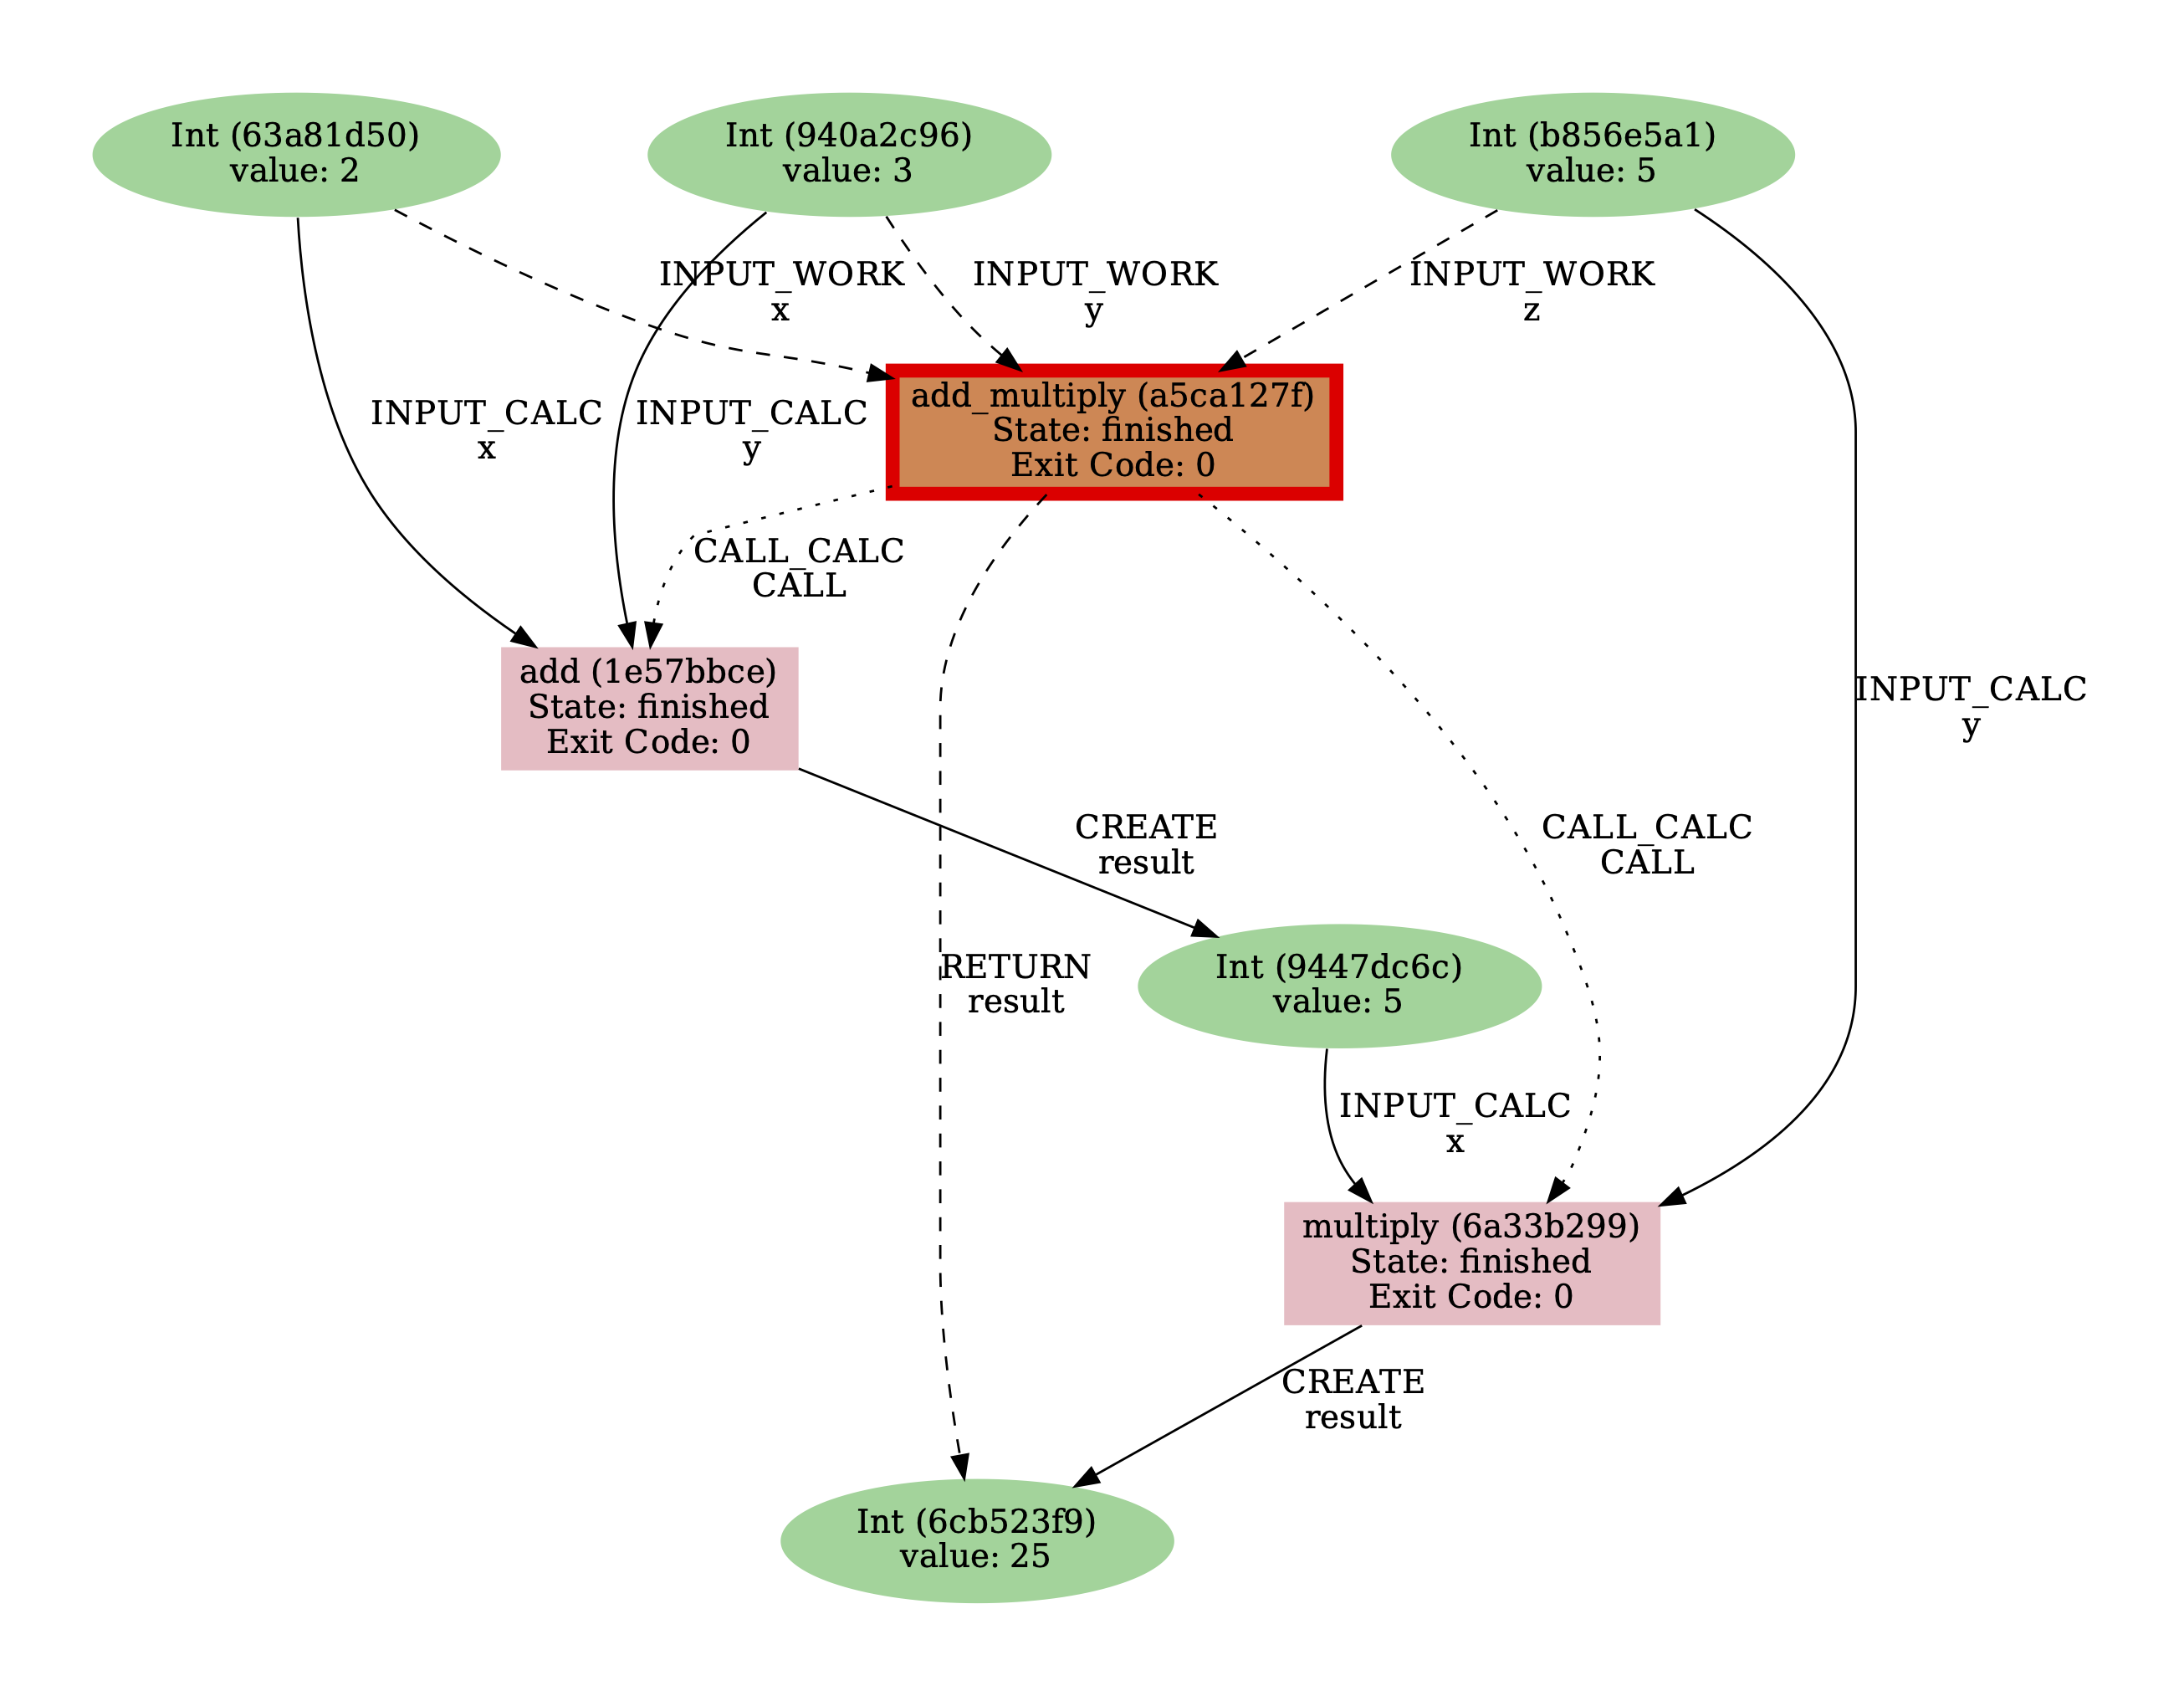
Fig. 10 Provenance graph for the add_multiply work function using the -i, --process-in option.#
(3) Finally, try to generate the data provenance by:
Targetting the
multiplycalculation function instead of theadd_multiplymethod.Using the
-l, --link-typesoption to select thedatalinks only.
Solution
Use the -l option with data as an argument:
$ verdi node graph generate -l data <PK>
Note that <PK> here should be replaced by the PK of the multiply calculation function!
We now only see the data provenance, i.e. the workflows are no longer in the provenance graph.
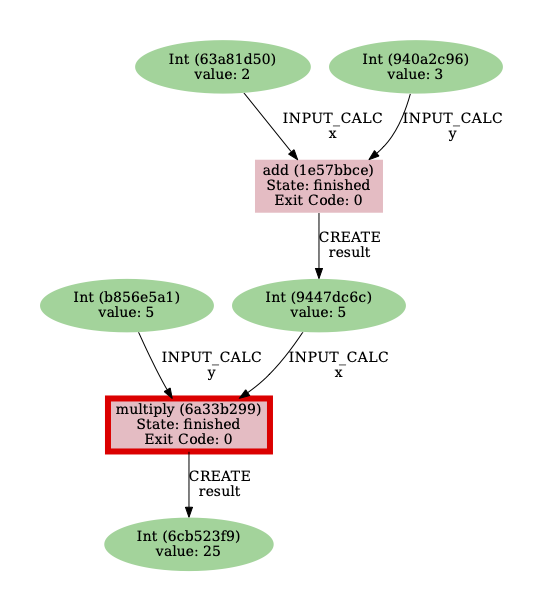
Fig. 11 Provenance graph for the multiply calculation function when only selecting the data provenance with the -l, --link-types option.#