
Set up
Contents
Set up#
Running on Microsoft Azure Kubernetes deployment#
For the tutorial running from 4-7 October 2022, we have set up a JupyterHub deployment based on the AiiDAlab docker stack and a Kubernetes cluster on Microsoft Azure. The JupyterHub is accessible via the following link:
https://aiida-tutorial-2022.aiidalab.io/
Authentication is done via GitHub, just click the “Sign in with GitHub button” to get started. If you don’t have a GitHub account yet, you’ll have to sign up for one:
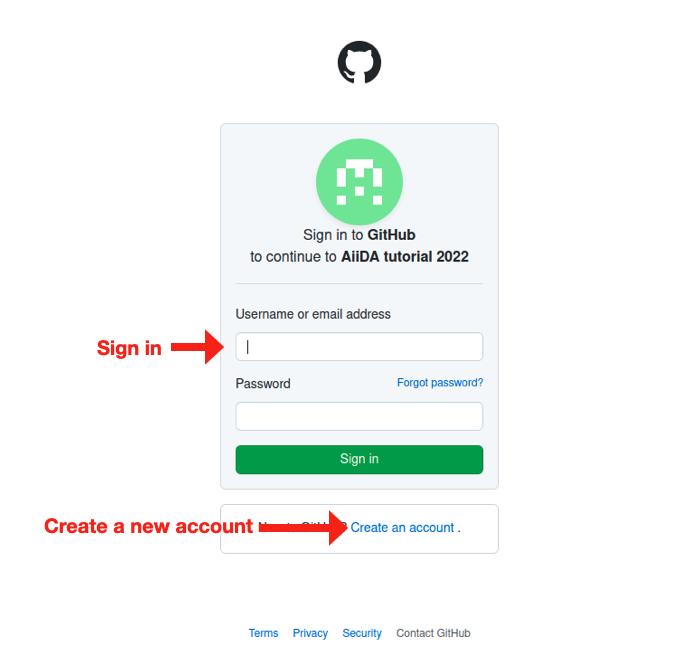
Fig. 1 Signing into GitHub.#
Once you’ve signed in, the GitHub authentication needs some basic information regarding your profile. Click “Authorize aiidalab” to continue.
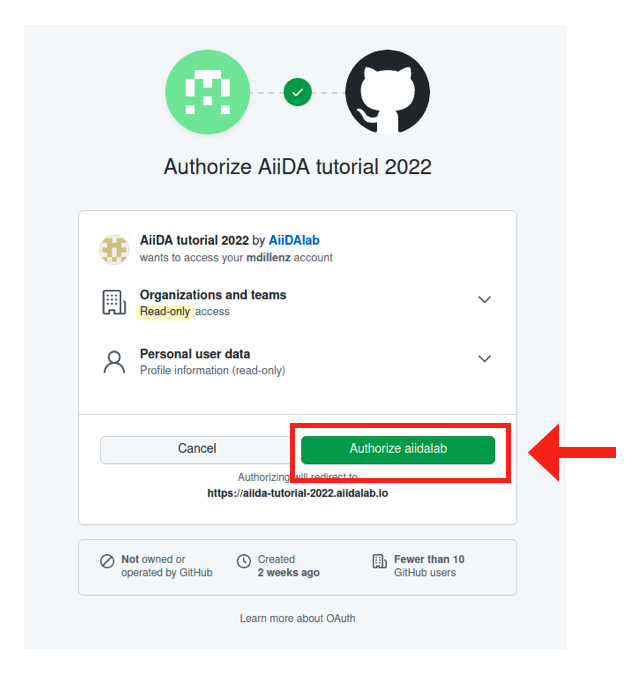
Fig. 2 Authorizing the AiiDAlab authentication.#
Once you’ve managed to authenticate successfully, you should see the JupyterLab interface.
Try to open a terminal and type verdi status.
If you see all green checkmarks, everything is set up successfully and you should be ready to go!
Important
As the tutorial has been fully tested on the Azure JupyterHub deployment, we highly recommend tutorial participants to run the tutorial material here! However, the Azure cluster will be taken down on Sunday October 16th at 23:59 CEST.
To download your files from the server prior to its destruction:
Open a terminal by clicking on “Terminal” on the start screen.
Execute
zip -r home.zip .Right-click on the
home.zipfile within the file browser tab.Click on “Download”.
You do not have to download the whole home directory of course, you can just download the files or directories that you would like to preserve.
If you want to export your full AiiDA profile into an archive, you can use:
$ verdi archive create --all tutorial.aiida
and then simply download the file from the JupyterHub cluster and import it wherever you want to continue working on the material.
Note
Deploying AiiDAlab on Microsoft Azure
Interested in having your own deployment of AiiDAlab on the Microsoft Azure Kubernetes Service? You can find all instructions on the corresponding GitHub repository:
Setup on your own machine#
To run the tutorial on your own machine, you need to install:
AiiDA (version 2.0.4)
aiida-quantumespresso (version 4.0.1)
Quantum ESPRESSO (version 7.0)
Note
Version numbers indicate the versions with which the tutorial was tested.
using AiiDAlab Launch#
AiiDAlab Launch makes it easy to run AiiDA on your own workstation or laptop.
To use AiiDAlab launch you will have to
Install Docker on your workstation or laptop and Manage Docker as a non-root user.
Install AiiDAlab launch with pipx (recommended):
pipx install aiidalab-launchOr directly with pip (
pip install aiidalab-launch).Create a profile for tutorial
aiidalab-launch profiles add tutorialIt will ask you to edit the profile, since for the tutorial we only need the AiiDA environment, answer
Yand let’s remove theaiidalab-widgets-basefrom thedefault_appslist (or the wholedefault_appsline).Start AiiDAlab for
tutorialprofile withaiidalab-launch start -p tutorialFollow the instructions on screen to open AiiDAlab in the browser.
See aiidalab-launch --help for detailed help.